Homemade cocoa butter lip balm recipe with essential oils
Chilly weather calls desperately for a good homemade lip balm recipe. Make an adorable lip balm that heals dry lips, tastes good, and has an irresistible scent. This easy cocoa butter lip balm recipe has only three ingredients, and can be whipped up in five minutes!

When you are on the path to a more natural lifestyle, lip balm is a simple step to take. Making your own skin care products can be as simple as this recipe with the three ingredients. When starting with just one thing that you need, often you’ll soon notice that you’ll be getting confidence to make the next step and make your own natural sugar scrub and maybe even shampoo!
When the cold comes, I’ll make some lip balm to take care of my lips and the lips of our whole family. The change weathers sneak silently. All of a sudden, the rainy autumn has changed to a cold winter, and I am not prepared. Luckily, this easy lip balm recipe is done in no time, regardless of the weather! When this is done, I have one worry less about keeping the family in good health in times of freezing snowstorms. I shared this recipe on Instagram when it was freezing out here!
Tips for making
- Use quality ingredients, and choose organic when it is possible.
- Essential oils are very strong, so do not exaggerate the amount!
- Adjust the recipe depending on the size of your lip balm jars or tubes. Making just the amount you’ll need for it is so easy to do more when the jar is empty.
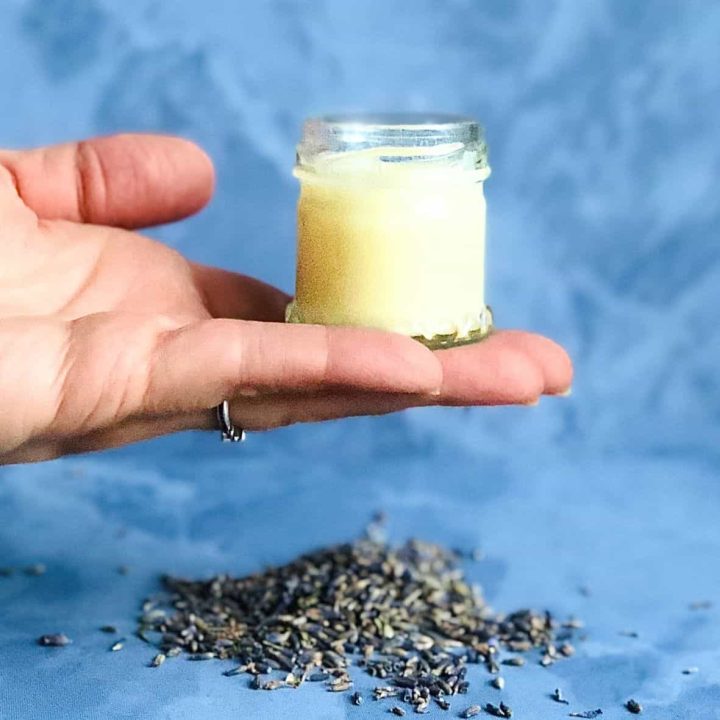
- You don’t need lip balm tubes – I use simply repurposed jam jars for lip balms!
- Clean the chosen lip balm container well to extend the expiration date before filling them.

Short on time?
Pin it for later!
The benefits of homemade cocoa butter lip balm
Homemade lip balm is beneficial for you in many ways. It is, most of all, your possibility to know and decide the raw material used in your product that you apply to your skin.
Homemade is more affordable in the long run
The starting costs of skin care products might be high and that makes people wonder. But when you have started you’ll notice that the same basic ingredients are used in many different types of skin care products. You can easily buy in bulk the ingredients and eventually, it will be cheaper.
If you think, for example this lip balm recipe. Coconut oil, you might already have in the kitchen – what you can eat, you can apply to your skin without any doubt. Cocoa butter is more expensive, but the need for this recipe can be as small as 2 tablespoons if you are doing only one lip balm. Essential oils last for several years, and for this one, you need a few drops at a minimum. Versatile essential oils you can use in diffusers, other skin care products, and even house cleaning!
DIY lip balm is quick to make
So the homemade lip balm is inexpensive, no doubt. In addition, it is quick to make. 5-10 minutes and you have your homemade lip balm ready, cooling in the jar. How cool is that!
No harmful chemicals added
When you make your lip balm, you can use all-natural ingredients with no additional preservatives, fragrances, or other ingredients that you cannot even pronounce. It contains what YOU want – nothing more, nothing less. In lip balms, as in other balms, less is more; that’s why three ingredients are just perfect.
Repurpose a jam jar for your lip balm
You don’t need a lip balm tube to make these at home. I simply repurpose a tiny jam jar! Just remove the label with running hot water and soap. If the glue of the label does not come off easily, I use either butter that I melt in my hands, rub on, and wash normally, or nail polish remover. Depending on the colors and style of the lid, you can paint it or leave it plain. Repurposing jam jars is cheaper, and there’s always some small jars you’ll find at home. Scroll to the end of post for decoration and gift ideas!

Ingredients you need for cocoa butter lip balm
Cocoa butter
Cocoa butter is a vegetable fat that is made of cocoa beans. Cocoa butter has several benefits and uses. It absorbs well into the skin and it protects the skin from dryness due to its moisturizing properties. Cocoa butter is safe to use and very rarely causes any skin irritations or other problems. For lip balm moisturizing cocoa butter is the key ingredient to use.
Coconut oil
Use unrefined and organic when possible. Unrefined is less processed. The melting point of coconut oil is lower than body temperature so it spreads easily. Read more about the differences between choosing and usage of refined and unrefined coconut oil here.
Essential oils to use for lip balm
LAVENDER: Is lavender good for lip balm? The answer is yes! I prefer to use lavender in many skin products for its soothing properties and calming scent. To know more about using and the benefits of lavender essential oil, you can find Laura from Our Oily House to explain you a bit more here.
TEA TREE: Another essential oil that I use often is tea tree. The tea tree is purifying and it cleanses well and also boosts your immune system! Read about the benefits and uses of tea tree essential oils here.
ROSEMARY: Often rosemary is used only in the kitchen but as an essential oil, I find it very helpful in skin care as well. It has cleansing properties that are beneficial for the skin. It can be used for skin imperfections too. Find more about rosemary essential oil here.

Tools you may need
- Cutting board and knife
- Measuring spoons
- Little stainless steal pot
- Spoon for stirring
- Little jars with lids or lip balm tubes for storing
Making cocoa butter lip balm
Step one: Measure and melt the butter and oil
Measure the cocoa butter in the pot. The cocoa butter you have might be in smaller chunks that are easy just eyeball to have the amount you need. If you have a big chunk of cocoa butter, like I do, use a knife to cut smaller chunks and add them to the pot. To cut more easily and safely, you can heat the blade of the knife with running hot water.
Measure the coconut oil and add it to the pot with cocoa butter. You have two options there. You can heat the cocoa butter and coconut oil on a bain-marie or directly in a pot.
BAIN-MARIE: To create a bain-marie, put a heatproof bowl on the top of a pot filled with about five centimeters of water to create the steam to heat the bowl. Make sure that the water does not touch the bottom of the bowl. This is a good option if you are afraid of burning your delicate ingredients.
However, I do find it easier and faster when heating directly in a pot. Coconut oil melts already at 24°C (75,2°F) and cocoa butter at 35°C (95°F), so low heat is sufficient.
Put the pot with the cocoa butter and coconut oil on the stove and turn on a low heat. When the oil and butter start to turn into a liquid form, just turn off the heat. Continue stirring the mixture, and the rest of the chunks will melt in after a while due to the heat of the liquid.

Step two: Cool and add essential oils
When the mixture is all melted, stir for a while to cool it down. If you want all of the lip balms to have the same scent, you can add the essential oils directly to the pot. To vary the scents, you can pour the mixture into lip balm jars and add the essential oils in each jar separately. Due to the idea of giving these lip balms as presents, I wanted to have two different scents: one with plain lavender and the other with a mixture of rosemary and tea tree.
Just drop the essential oil into the jar and use a small spoon or a toothpick to mix it well. Stir enough to make the scent spread into the mix evenly.


Step three: Close airtightly and move to the fridge to chill
Close the lids well and move the lip balms to cool down in the fridge. I use for this purpose a small tray (repurposed crayon box!) to facilitate moving the lip balms. It takes up to 1 hour to chill the mixture. You can see the change in colour and texture that is first trans lucid and then firm lip balm.
Using the cocoa butter lip balm
Take a small amount of the blame with your finger and spread it evenly on your lips. Use it regularly during the cold and especially windy weather, and whenever you feel your lips are dry. Remember that if you keep it in the inside pocket of your jacket in a warm place, the balm melts very quickly to a liquid state. So, just be careful when you open the jar. The balm settles down again easily in cold temperatures.
Storing homemade lip balm
Keep the unopened jars in the fridge to extend the expiration date. When applying the balm with a finger, remember to use an opened lip balm within a few months.

Little Helper
Making homemade cocoa butter lip balm with your little helper is not too challenging. The measuring of the ingredients is fun and quick!
When the mixture is melting in the pot, there is time for arranging the jars. Opening and closing them is also good entertainment.
When using essential oils with kids, remember that they are very strong, so leave measuring for older children.
Enjoy sniffing quickly the different scents to decide together which scents are good and which are not so enjoyable – children do have clear opinions on this one!
Recipe card is below!

Short on time?
Pin it for later!
Homemade cocoa butter lip balm with essential oils
Make an adorable homemade lip balm that heals dry lips, tastes good, and has an irresistible scent. This easy cocoa butter lip balm recipe has only three ingredients, and can be whipped up in five minutes!
Materials
- 6 tbsp cocoa butter
- 6 tbsp coconut oil
- 20-24 drops of essential oils
Tools
- Measuring spoon
- Cutting board and knife
- Tiny pot
- 6 jars for storing the lip balms
Instructions
- Step one: Measure and melt the butter and oil
Measure the cocoa butter and the coconut oil into the pot. You can heat the cocoa butter and coconut oil on a bain-marie or directly in a pot. Put the pot with the cocoa butter and coconut oil on the stove and turn on a low heat. When the oil and butter start to turn into a liquid form, just turn off the heat. Continue stirring the mixture, and the rest of the chunks will melt in after a while due to the heat of the liquid. - Step two: Cool and add essential oils
When the mixture is all melted, stir for a while to cool it down. If you want all of the lip balms to have the same scent, you can add the essential oils directly to the pot. To vary the scents, you can pour the mixture into lip balm jars and add the essential oils in each jar separately. Just drop the essential oil into the jar and use a small spoon or a toothpick to mix it well. Stir enough to make the scent spread into the mix evenly. - Step three: Close airtightly and move to the fridge to chill
Close the lids well and move the lip balms to cool down in the fridge. I use for this purpose a small tray (repurposed crayon box!) to facilitate moving the lip balms. It takes up to 1 hour to chill the mixture. You can see the change in colour and texture that is first trans lucid and then firm lip balm
Using the cocoa butter lip balm
Take a small amount of the blame with your finger and spread it evenly on your lips. Use it regularly during the cold and especially windy weather, and whenever you feel your lips are dry. Remember that if you keep it in the inside pocket of your jacket in a warm place, the balm melts very quickly to a liquid state. So, just be careful when you open the jar. The balm settles down again easily in cold temperatures.
Storing homemade lip balm
Keep the unopened jars in the fridge to extend the expiration date. When applying the balm with a finger, remember to use an opened lip balm within a few months.
Notes
Read more in the post about the benefits of the homemade lip balm, the tips for making, more about the ingredients, and options.
Adjusting the recipe
You can adjust the recipe depending the size of your jars. Use coconut oil and cocoa butter with 1:1 ratio and about 3-4 drops of essential oil for each 2 tablespoons. For exampe I had 1 tbs cocoa butter, 1 tbs coconut oil 4 drops of essential oil per jar in this recipe.
Are you going to try the cocoa butter lip balm?
Are you thinking to try the cocoa butter lip balm? Will you do it for you and your family or give it as a Christmas present? What scents you would like to use in your lip balm? Let me know in the comments!


This is such a cool idea! While it may be a little messy, it sounds like a lot of fun to make and being able to know exactly what’s in the lip balm and have whatever scent we like is amazing! Thank you for sharing this, and for the warning about how quikcly it can turn back to liquid when warm lol
Thanks for your comment and insights, Katherine. I’m glad you liked it!