7 Tea Colored Easter Eggs: How to Dye Eggs Naturally with Tea
Using tea to color Easter eggs creates soft, earthy tones and is a beautiful way to try naturally dyed Easter eggs at home. In this guide, I’ll show you step-by-step how to make tea Easter eggs using simple ingredients like tea and vinegar.

I had such a fun time darkening wood with my homemade tea stain that I couldn’t resist trying this idea when a friend suggested dyeing eggs with tea for Easter. So, tea-dyed Easter eggs were definitely on my natural lifestyle Bucket List for March.
And honestly — the results were even more beautiful than I expected.
Best Teas for Natural Easter Egg Coloring
In this experiment with natural Easter egg coloring, I chose affordable true teas (sorry, matcha), and herbal teas that you likely already have at home.
Loose-Leaf Teas for Dyeing Easter Eggs Naturally
I used loose-leaf tea, but tea bags work just as well for dyeing Easter eggs naturally. All of the teas gave strong and vibrant colours to the eggs. This might be because of the tannins that the leaves contain and the reaction with the vinegar when infusing the eggs.
- Black tea – I used an Irish Breakfast blend
- Green tea (1) – Chinese Gunpowder
- Green tea (2) – Sencha
Herbal Teas for Naturally Dyed Easter Eggs
Herbal teas create especially unique, muted tones—from soft sage to warm honey shades.
- Hibiscus – red petals only
- Rooibos – red rooibos
- Chamomile – whole flower heads
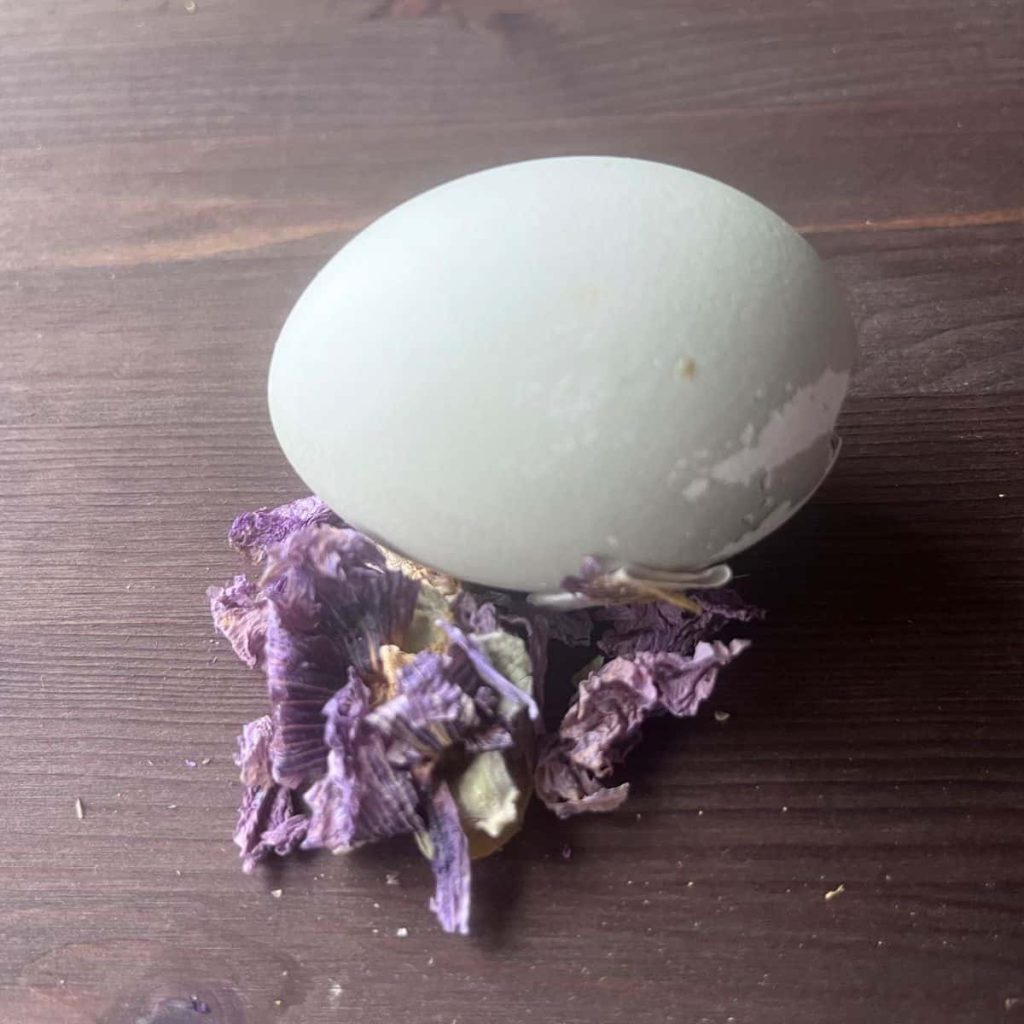
- Mallow – blue petals only
Natural Tea-Dyed Easter Egg Color Chart
Here’s the full color scale from this tea dyed eggs test:
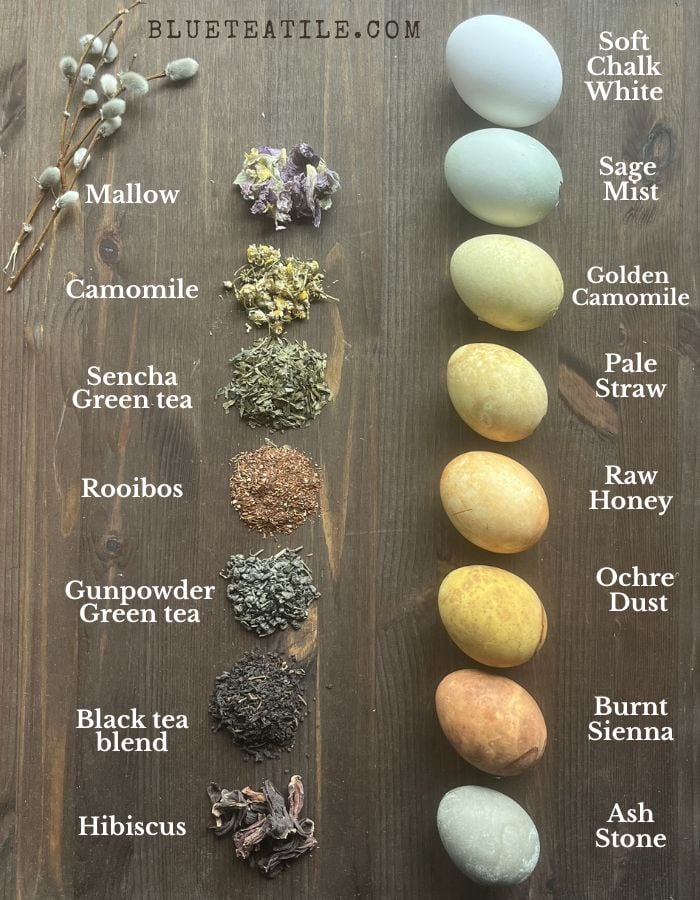
- Undyed — Soft Chalk White
- Mallow petals — Sage Mist
- Chamomile — Golden Chamomile
- Sencha green tea — Pale Straw
- Red rooibos — Raw Honey
- Gunpowder green tea — Ochre Dust
- Black tea — Burnt Sienna
- Hibiscus — Ash Stone
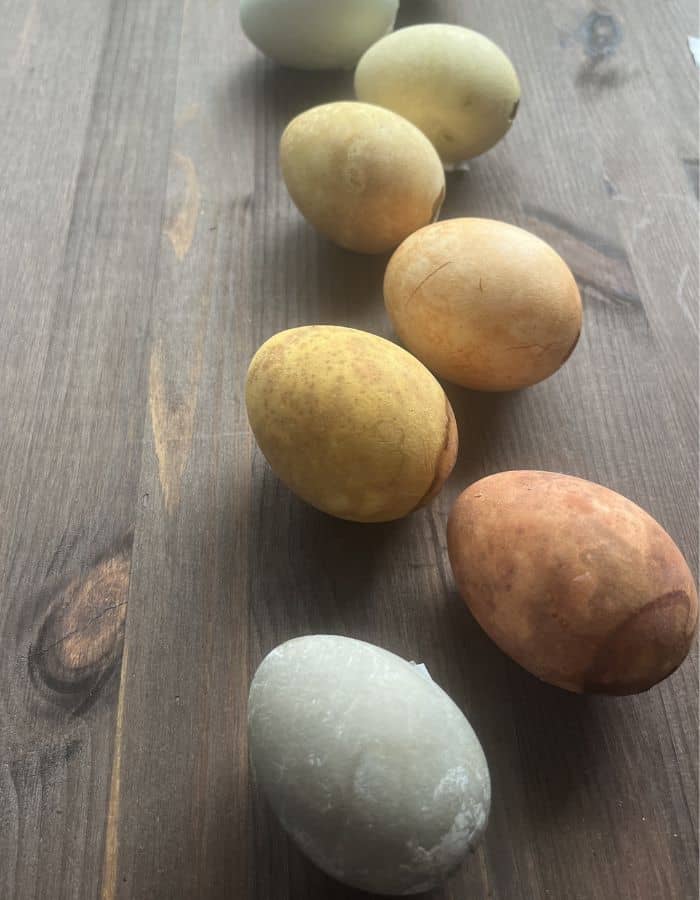
At first, I loved all the colors but the Mallow one, for I thought it didn’t differ too much from the undyed white egg. But after a week, the colour deepened and took on beautiful green-blue hues, and now it is one of my favourites! In the photo, you can see the color contrast best where the scratches show the natural white chalk color of the egg shell, and the mallow colored slightly green-blue.
The biggest surprise was with hibiscus, for the first time, the tea was a deep red colour, but then the eggshell turned into an intriguing ash stone color!

One of the deepest colors, on the side of the burnt sienna of the Rooibos tea, came from the Chinese gunpowder tea. We use Chinese gunpowder tea to make sweet Moroccan mint tea, so we have plenty of it at home, so I decided to try it out.
Little did I know that gunpowder green tea could give such beautiful and strong yellow hues! I left the loose tea leaves to swim and infuse with the egg for 24 hours, so it made an interesting, uneven natural pattern on the surface of the egg, as you can see below.

Tools You Need for Tea Easter Eggs
- Cup or bowl – Use separate cups for different colors or one bowl for batch dyeing
- Water kettle
- Teaspoon – for measuring
- Needle and sharp knife – if you plan to empty the eggs
Materials for Naturally Colored Easter Eggs
- Egg carton – for drying
- Loose-leaf or herbal tea – see color examples above
- White eggs – these show the colors best
- Vinegar – helps the color absorb into the shell
- Cotton cloth – for removing stamps from store-bought eggs
Short on time?
Pin it for later!
How to Dye Eggs Naturally with Tea (Step-by-Step)
This method is simple and perfect if you want to try how to dye eggs naturally without artificial colors.
Step 1: Prepare the Eggs
Remove any stamps from the eggshell by gently rubbing with a cotton cloth dipped in vinegar.
You can either:
- Boil the eggs, or
- Empty the eggshells (my preferred method for reusable decorations)
If you’re like me and want to keep your decorations longer than one day, emptying the eggs is your option. You’ll find full instructions below.
Step 2: Prepare the Tea Dye
Boil water and measure:
- 2 teaspoons of tea per 150 ml (5 oz) of water

Pour the hot water over the tea and let it steep for 15 minutes.
After steeping, add:
- 1 teaspoon of vinegar per 150 ml (5 oz)
| Tip: Add vinegar after steeping—adding it too early reduces its effectiveness.

Step 3: Dye the Eggs
Place the eggs into the tea.
- Boiled eggs will sink easily
- Empty eggs need to fill with liquid to stay submerged
Make sure the eggs are fully covered for even tea dyed Easter eggs.

Step 4: Let the Eggs Sit and Dry
Gently move the eggs occasionally for even coloring.

- Light color: ~15 minutes
- Deeper tones: several hours to 24 hours
Once you’re happy with the color, transfer the eggs to an egg carton to dry.

Tips for Tea Easter Eggs: Getting the Best Natural Color Results
These simple tips will help you control the final look of your tea dyed Easter eggs, from soft and even tones to more rustic patterns:
Use vinegar to help the color attach properly to the eggshell.
I also noticed that the shades continue to deepen slightly even up to a week after dyeing.
If you want a natural, slightly uneven pattern and deeper tones for your naturally dyed Easter eggs, leave the tea leaves in the liquid without straining. Move the eggs occasionally to ensure even coverage.
For smoother, more even-colored eggs, strain the tea before immersing the eggs.
Short on time?
Pin it for later!
How to Empty Eggshells for Natural Easter Decorations
If you want reusable natural dyed Easter eggs, I highly recommend emptying the shells first.
What You Need
- Small sharp knife (like a fruit knife)
- Needle
- Bowl
Step-by-Step Instructions
- Gently tap the wider end of the egg with a knife to create a small opening (about finger-width)
- Use a needle to poke a small hole on the narrow end
- Hold the egg over a bowl and blow through the small hole until the contents come out
- Rinse the shell by running water through it, shake gently, and repeat a few times
PRO TIP: Use the egg contents to make an omelette or a yummy oven pancake to avoid waste.
Final Thoughts on Dyeing Easter Eggs Naturally with Tea
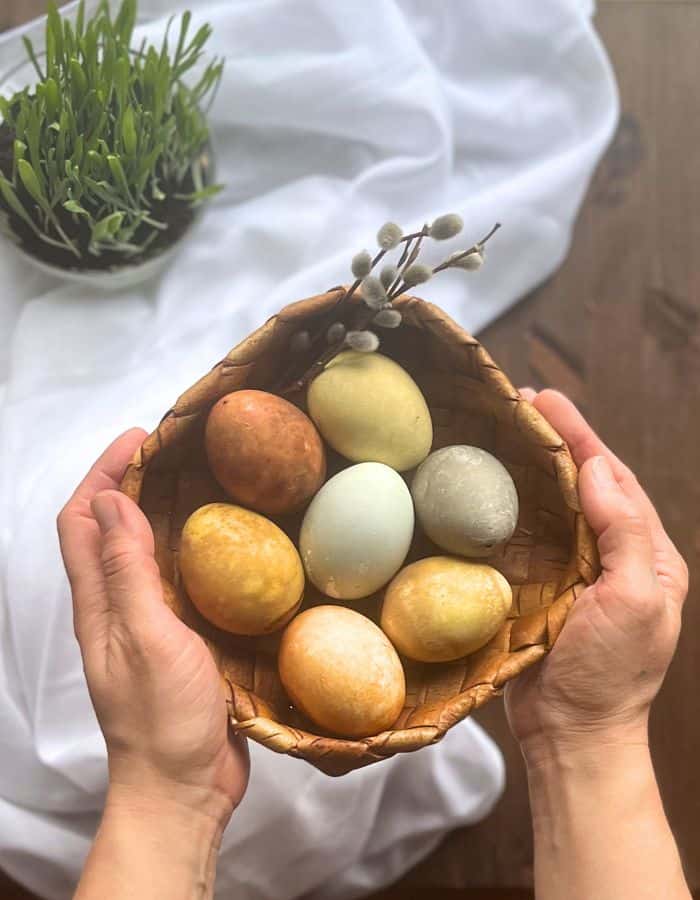
Making naturally colored Easter eggs with tea is one of the simplest and most satisfying DIYs for spring. Each tea creates a unique tone, and the process itself feels calm and intentional—very much in line with a natural lifestyle.
Place tea-colored eggs in a small basket as an Easter decoration on a table. You can tie a twig wreath base and adorn it with natural materials to complement your DIY Easter eggs.
| BE INSPIRED: Natural Wreath Ideas for Nordic Foraged Wreath DIY
Short on time?
Pin it for later!
If you enjoy working with natural materials, this is a lovely tradition to return to every year.

Naturally Colored Easter Eggs with Tea
Using tea to color Easter eggs creates soft, earthy tones and is a beautiful way to try naturally dyed Easter eggs at home. In this guide, I’ll show you step-by-step how to make tea Easter eggs using simple ingredients like tea and vinegar.
Materials
- Loose-leaf or herbal tea – see link to color examples in the notes
- White eggs – these show the colors best
- Vinegar – helps the color absorb into the shell
- Cotton cloth – for removing stamps from store-bought eggs
- Egg carton – for drying
Tools
- Cup or bowl – Use separate cups for different colors or one bowl for batch dyeing
- Water kettle
- Teaspoon – for measuring
- Needle and sharp knife – if you plan to empty the eggs
Instructions
- Step 1: Prepare the Eggs
Remove any stamps from the eggshell by gently rubbing with a cotton cloth dipped in vinegar.
You can either:
- Boil the eggs, or
- Empty the eggshells (my preferred method for reusable decorations)
If you’re like me and want to keep your decorations longer than one day, emptying the eggs is your option. - Step 2: Prepare the Tea Dye
Boil water and add:
- 2 teaspoons of tea per 150 ml (5 oz) of water
Pour the hot water over the tea and let it steep for 15 minutes.
After steeping, add:
- 1 teaspoon of vinegar per 150 ml (5 oz)
Tip: Add vinegar after steeping—adding it too early reduces its effectiveness. - Step 3: Dye the Eggs
Place the eggs into the tea.
- Boiled eggs will sink easily
- Empty eggs need to fill with liquid to stay submerged
Make sure the eggs are fully covered for even tea dyed Easter eggs. - Step 4: Let the Eggs Sit and Dry
Gently move the eggs occasionally for even coloring.
- Light color: ~15 minutes
- Deeper tones: several hours to 24 hours
Once you’re happy with the color, transfer the eggs to an egg carton to dry.
Notes
- See the color examples to decide which teas to use for the coloring.
- Follow my instructions in this post on How to empty the eggshells.
- For the best results check out my Tips for Tea Easter Eggs.
- See step-step-photos higher on this post.


